

今回の記事では、Line風のトーク画面の作成方法についてまとめています。
「プロンプトで設定した情報を基にしたchatGPTとの会話」の完成を目的としているので、ユーザー同士のコミュニケーションをとることを目的にしたものではありません。
ですが、どのように構成すればLine風のトークアプリができるのかなどはこの記事を参考にしていただければできると思います!
それでは初めて行きます。
完成図をまず先にご紹介
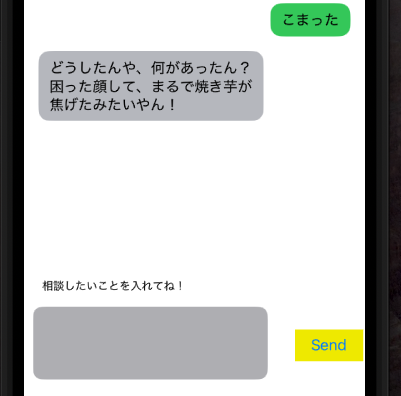
この記事では、トーク画面とメッセージを送るビューを作成することを目標とします。
レイアウトについて

レイアウトはこのように設定しましょう。
tableviewに、Cellを配置しカスタムセルとし、その中にさらにviewを作って文章を入れるのがポイントです。
かなりの入れ子構造になってしまいますが、レイアウトなどを管理する観点で見ると、このように設定するのがおすすめです。
View Controller側の設定
ブロックごとに分けて全て公開していきます。
まずは、該当のviewControllerに、TextViewDelegateを入れてあげましょう。
class ChatViewController: UIViewController, UITextViewDelegate{}viewDidLoad()内の処理
     tableView.dataSource = self
        tableView.separatorStyle = .none
        tableView.allowsSelection = false
        tableView.estimatedRowHeight = 40
        tableView.rowHeight = UITableView.automaticDimension
        messageTextView.delegate = self
        messageTextView.isScrollEnabled = true
        messageTextView.text = ""
        messageTextView.layer.cornerRadius = 10
        messageTextView.font = UIFont.systemFont(ofSize: 16)
        messageTextView.textContainerInset = UIEdgeInsets(top: 8, left: 4, bottom: 8, right: 4)
        nameLabel.text = userName
        subLabel.text = userSub
        if let imageName = userImageName {
            userImageView.image = UIImage(named: imageName)
        }

//キーボード関連の処理
        NotificationCenter.default.addObserver(self,
            selector: #selector(keyboardWillShow(_:)),
            name: UIResponder.keyboardWillShowNotification,
            object: nil)
        NotificationCenter.default.addObserver(self,
            selector: #selector(keyboardWillHide(_:)),
            name: UIResponder.keyboardWillHideNotification,
            object: nil)
キーボード関連の処理
    @objc func keyboardWillShow(_ notification: Notification) {
        if let keyboardFrame = (notification.userInfo?[UIResponder.keyboardFrameEndUserInfoKey] as? NSValue)?.cgRectValue {
            UIView.animate(withDuration: 0.3) {
                self.bottomConstraint.constant = keyboardFrame.height
                self.view.layoutIfNeeded()
            }
        }
    }

    @objc func keyboardWillHide(_ notification: Notification) {
        UIView.animate(withDuration: 0.3) {
            self.bottomConstraint.constant = 0
            self.view.layoutIfNeeded()
        }
    }

    deinit {
        NotificationCenter.default.removeObserver(self)
    }

  func scrollToBottom() {
        let indexPath = IndexPath(row: messages.count - 1, section: 0)
        tableView.scrollToRow(at: indexPath, at: .bottom, animated: true)
    }
sendボタンを押した際の処理
    @IBAction func sendButtonTapped(_ sender: UIButton) {
        guard let text = messageTextView.text, !text.trimmingCharacters(in: .whitespacesAndNewlines).isEmpty else { return }

        messages.append(Message(text: text, isSentByCurrentUser: true))
        tableView.reloadData()
        messageTextView.text = ""
        messageTextView.resignFirstResponder()

        let loadingIndex = messages.count
        messages.append(Message(text: "・・・", isSentByCurrentUser: false))
        tableView.reloadData()
        scrollToBottom()

        sendToChatGPT(message: text) { [weak self] response in
            guard let responseText = response else { return }
            DispatchQueue.main.async {
                self?.messages.remove(at: loadingIndex)
                self?.messages.append(Message(text: responseText, isSentByCurrentUser: false))
                self?.tableView.reloadData()
                self?.scrollToBottom()
            }
        }
}これに加えて、class ChatViewController: UIViewController, UITextViewDelegate{}外で、TableViewDataSourceを拡張してあげましょう。
extension ChatViewController: UITableViewDataSource {

    func tableView(_ tableView: UITableView, numberOfRowsInSection section: Int) -> Int {
        return messages.count
    }

    func tableView(_ tableView: UITableView, cellForRowAt indexPath: IndexPath) -> UITableViewCell {
        let message = messages[indexPath.row]
        if message.isSentByCurrentUser {
            let cell = tableView.dequeueReusableCell(withIdentifier: "RightMessageCell", for: indexPath) as! RightMessageCell
            cell.messageLabel.text = message.text
            return cell
        } else {
            let cell = tableView.dequeueReusableCell(withIdentifier: "LeftMessageCell", for: indexPath) as! LeftMessageCell
            cell.messageLabel.text = message.text
            return cell
        }
    }
}
Cell側の処理
Cocoa Touch Classより、[RightMessageCell.swift]、[LeftMessageCell.swift]というファイルを作成しましょう。
中のコードは特に記載する必要はないですが、丸みをおぼたチャット画面にしたいのでこのように記述しました。
class RightMessageCell: UITableViewCell {
@IBOutlet weak var messageLabel: UILabel!
@IBOutlet weak var bubbleView: UIView!
override func awakeFromNib() {
super.awakeFromNib()
bubbleView.layer.cornerRadius = 12
bubbleView.clipsToBounds = true
}
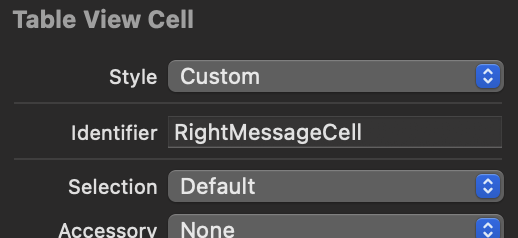
}storyboard側の処理
あとは、Identifierを、記述した通りに設定してやればOKです!
最後に
以上が、Line風トーク画面作成の手順となります。
iPhoneのアプリ開発に少しでも役立ててもらえたらと思います!


コメント